Once your form is built, you’ll need to enable Job Builder settings to let users create Projects from it.
How to enable Job Builder settings
- Go to your list of Form Types
- Click ‘Access Rules’ on the form you want to share
- In the Access Rules page, set ‘Job Builder Configuration’ to Yes
What this does
- Adds a ‘Job Builder’ button to the homepage dashboard for users with access
- Allows the form to be used to create new Projects, based on the settings you define
This turns your form into a fully functioning Job Builder. Ready to go.
Job Builder settings overview
There are lots of settings available, but only a few are essential to get started. Below is a breakdown of:
- Core settings – what you need to enable the Job Builder
- Additional options – to fine-tune how it behaves for your users
Let’s keep it simple and build from there.
Settings to Enable & Share Job Builder
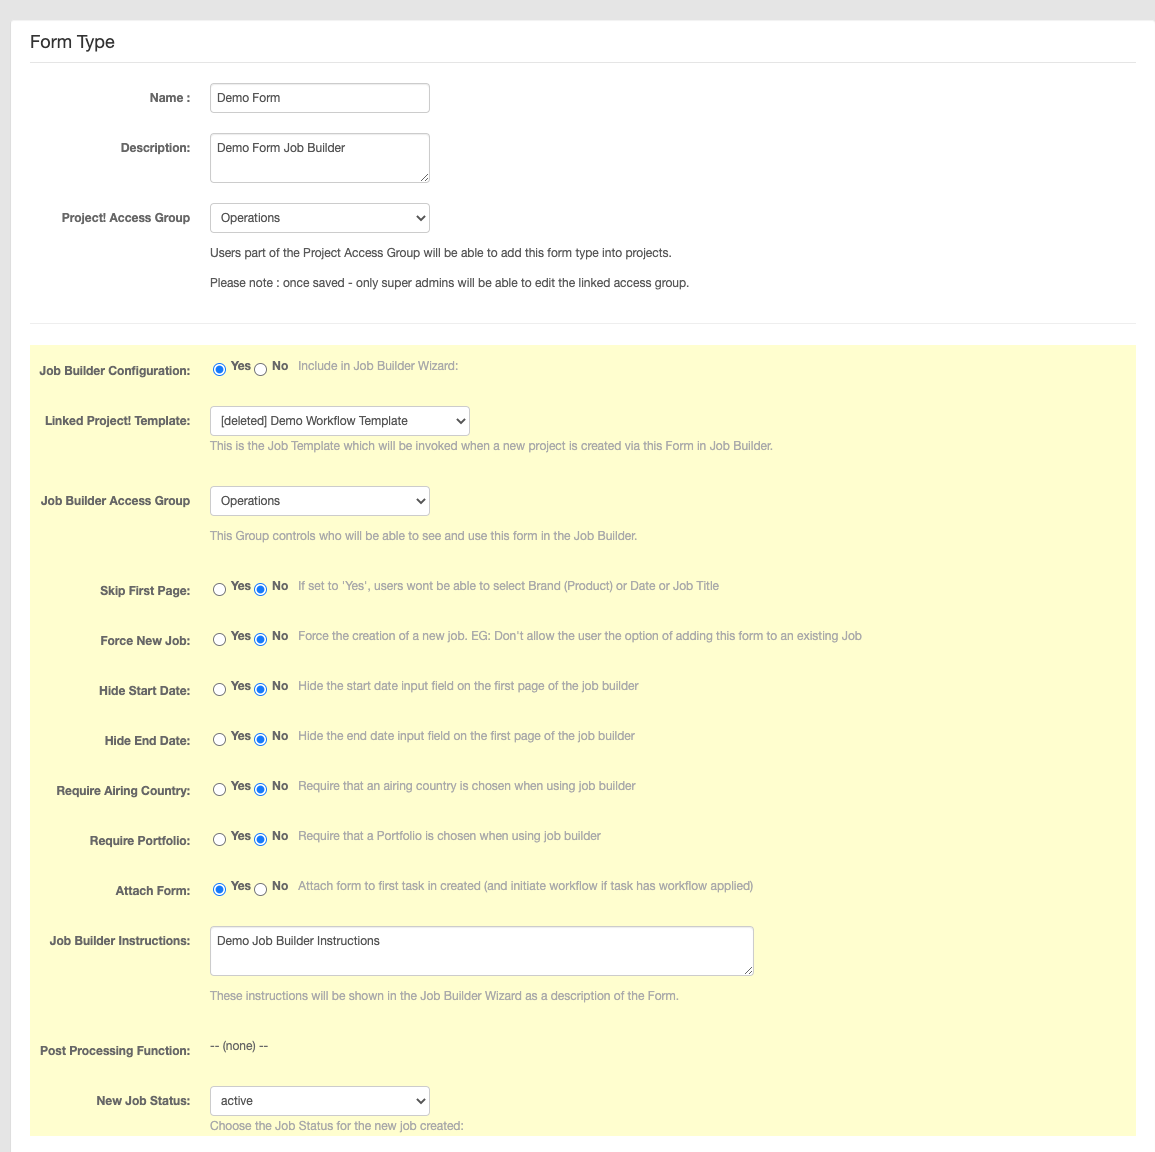
1. Linked Project Template
Choose a Project Template to auto-apply when someone uses this form.
Leave it blank if you don’t want to pre-load Tasks or Folders.
2. Job Builder Access Group
Select the User Group that should see this form.
Anyone in the group will get a ‘Job Builder’ button on their homepage — and see this form listed when they click it.
Additional Job Builder Settings
1. Skip first page
Set this to yes to skip the standard brand, title, and date questions.
Make sure your form includes fields for:
-Brand
-Project title
If not, Pronto will use the Job Number as the project title and assign the first brand the user has access to.
2. Force new job
Set to yes to always create a new project from this form.
Set to no to give users the option to submit the form into an existing project — where the answers will be saved as a form (and a PDF) inside that project.
3. Hide start date
Removes the start date field from the form.
Pronto will use the submission date as the start date (which a Project Manager can change later).
4. Hide end date
Removes the end date field from the form.
Pronto will leave the end date blank by default (Project Managers can update it as needed).
5. Require airing country
Choose yes if this field must be filled in before submission.
6. Require portfolio (campaign)
Choose yes if selecting a portfolio or campaign is mandatory.
7. Attach form
Set this to yes to attach a PDF version of the completed form to the first Task in the project.
If that Task has a workflow, it will trigger automatically — ideal if a Project Manager needs to review or approve the brief.
8. Job builder instructions
Add short guidance or context here. It appears below the form title to help users choose the right builder.
9. Post processing function
For advanced use only. This can trigger custom functions after the form is submitted and the project is created. Only set by a Pronto Admin.
10. New job status
Choose the default status for projects created through this form.
Defaults to Active, but you can set to In Review if it needs signoff from Finance or a Project Manager before moving forward.